-->

Welcome!

I am IT Solutions IT Services Photographer

View Work Hire Me!

About Me

Computer Services
Corporate IT Services Provider
Laptop Service Center
Know About IT Solutions

IT Solutions.

What We Do

As solution providers, we analyse the client’s current setup, understand their requirement from the IT setup, try to address the current and future requirement issues and accordingly offer solutions. The areas where we provide these solutions are: Hardware Solutions Servers/ Desktops/ Laptops Infrastructure Software High availability and Load balancing solutions Messaging and collaboration solutions Database solutions E- Security Solutions Virus protection Firewalls Intrusion prevention Spam prevention solution Virtual Private Networks Encryption Email monitoring and control Web surfing management Storage and Backup Management Solutions NAS/SAN solutions Automated backup Disaster recovery Network Solutions Network Performance management Wireless LAN Network monitoring.

Services

Web Design

Nulla metus metus ullamcorper vel tincidunt sed euismod nibh Quisque volutpat

Customer Support

Nulla metus metus ullamcorper vel tincidunt sed euismod nibh Quisque volutpat

Branding

Nulla metus metus ullamcorper vel tincidunt sed euismod nibh Quisque volutpat

Marketing

Nulla metus metus ullamcorper vel tincidunt sed euismod nibh Quisque volutpat

Our Blog

Using SoftPerfect Network Scanner to Scan Network


Using SoftPerfect Network Scanner to Scan Network

Let’s talk about SoftPerfect network scanner, a simple network tool that you can use to quickly scan your home network and look for active computer’s shared folders and access to them.

This is a good and small network tool to quickly discover total network connected computers, detect insecure network shares, gather existing network information in real time, shut down/wake up remote computer, etc. And here is the best part: It’s free and you can go to this link to download it! :)
Here are key features of this network scanner:
- Pings computers.
- Detects hardware (MAC) addresses even across routers.
- Detects your internal and external IP addresses.
- Detects hidden shared folders (normally invisible on the network) and write accessible shares.
- Scans for listening TCP ports and SNMP services.
- Retrieves currently logged-on users.
- You can mount and explore network resources.
- Can launch external third party applications.
- Exports results to HTML, XML, CSV and TXT
- Supports Wake-On-LAN and remote shutdown.
Here is simple way to use this program to scan network and check for computer’s shared folders:
1) There is no installation needed and you do not need administrative privileges to run this tool, just double-click the downloaded file and run it.
2) Let’s do quick configuration, go to Options and click Program Options.
configure network scanner
3) Go to Additional tab, tick on Resolve host names and Resolve MAC address options, so the program will resolve both hostname and MAC address.
network scanner resolve hostname and MAC address
4) Go to Shares tab, tick on Scan for shared resources and Check for write access options. Also check the Enumerate All radio button.
network scanner - scan shared resource
5) Ok. Let’s check your computer’s IP address by using ipconfig in command prompt (cmd.exe), after that key in the entire network range for scanning. Click Start scanning.
Example1: If computer’s IP is 10.10.0.100, you can key in IP range from 10.0.0.0 to 10.255.255.255
Example2: If computer’s IP is 192.168.1.253, you can key in IP range from 192.0.0.0 to 192.255.255.255
Example3: If computer’s IP is 192.168.100.200, you can key in IP range from 192.168.0.0 to 192.168.255.255
use network scanner to scan network
6) After successful network scanning, this network scanner will display all discovered computers with shared folders on your network. It will show you the hostname and MAC address of the computers as well. You can just double-click the shared folder to try accessing it.
Note: For the shared folder showed with lock symbol, you need to provide username and password in order to access it.
Note: ADMIN$, D$ and C$ are hidden and default shares on computer DAVID. It’s hidden because you won’t be able to see the folder if you type \\\\DAVID in address bar of file explorer.
SoftPerfect network scanner result

Changing Remote Desktop Port in Microsoft Windows


Changing Remote Desktop Port in Microsoft Windows

This article will show you how to change Remote Desktop port from default TCP 3386 to any port number you want as according to your requirement. This might be needed if the default port is already used by other application on your network.

Without wasting more time, let’s start. The change is pretty simple by making minor change in registry, but you need to be careful when using registry editor. You Windows OS might not work well if you make incorrect registry change. This registry change works well in Windows 7, Vista and XP after testing, and you can try on other Windows OS too. 1) Let me use Windows 7 as example here: Go to Start and run registry editor program (regedit).
registry editor in Windows 7
2) Registry editor window will appear, browse and locate following registry subkey – PortNumber. Right click to modify it.
remote desktop port registry subkey
remote desktop port subkey in registry
3) Change to decimal mode, after that key in new port number. As an example, I change it to port 20000. Click OK and close registry program finally.
Note: Please note that if you have enabled firewall on this Remote Desktop enabled computer, you need to configure firewall to permit Remote Desktop traffic on new port. If not, other users will face problem to connect to this computer.
change remote desktop port TCP 3389
4) Restart you computer or Remote Desktop program for the change to take effect. From now on other user can only connect to this Remote Desktop enabled computer by using client program in this format: IP-address:port-number (example: 192.168.1.100:20000)
connect to remote desktop customized port


Sharing Internet by Using Connectify Easily

Yes! Sharing Internet by using Connectify software router easily!
You can easily share your DSL or Cable, or even 3G/4G Internet connection to other computer, laptop or other mobile devices by using this software on computer.

This is another way of Internet sharing other than using Internet Connection Sharing in Microsoft Windows OS. This Connectify software router is developed by connectify.me, and you can find Connectify Lite (Free) or Pro version (need to purchase) on the website.
Connectify Lite/Pro features:
-Work as software Access Point by sharing DSL/Cable Internet connection
-Share Internet from other wireless network
-Display connected computers or mobile devices
-Provide simple firewall feature
Additional Connectify Pro features
-Share 3G/4G Internet connection
-“Fling” drag and drop file transfer
-Repeater functionality
-Fully customizable SSID
The software can be installed in Windows 7 (both 32 and 64 bit versions), Windows Vista 32-bit with SP2 and Windows XP 32-bit with SP3. I think it can be installed on future newer Windows OS too.
Please take note that this software router can only operate in Ad-hoc mode if you install it in Windows XP or Vista due to OS limitation, however it can operate in Access Point (AP) mode if you install it in Windows 7 with compatible wireless adapter. Access Point mode allows you to create a wireless hotspot using the same wireless adapter that you are using to access the Internet but it can’t be done in Ad-hoc mode. This AP mode is good way to extend your wireless network coverage too.

Sharing Internet (Cable or DSL) by Using Connectify Lite

use Connectify software router to share Internet
In this case I’ve a computer which is equipped with wired network adapter and also wireless adapter, and the wired adapter is connected to Internet via DSL/Cable connection. I will then use Connectify software router for sharing Internet connection with other computers.
This is the way to do it on that computer with Internet connection:
1) Select wired network adapter in Internet to share option, after that select Wi-Fi as Share over option. Select Wi-Fi Ad-Hoc, Encrypted (WEP) mode and then set password, so that WEP password authentication is required for other computers to join this wireless network and access to Internet. Finally click Start Hotspot.
Note: As this is XP computer and so no AP mode is supported, you can only configure it as Open ad-hoc wireless hotspot or WEP encrypted wireless hotspot. As WEP is vulnerable and easily to be cracked, and so I don’t really recommend to use Connectify this way in Windows XP, you should use this software router in Windows 7 that supports AP mode and much secure encryption (WPA2, WPA).
Connectify wireless hotspot
2) On other computer, you should configure TCP/IP on their local area connection to obtain an IP address automatically after connecting to this wireless hotspot. Those computers will be assigned IP address in the 192.168.42.x range and able to access Internet through this Connectify enabled computer (default gateway is 192.168.42.1).
obtain IP address automatically
3) On that Connectify enabled computer, you willl be able to see the connected computer name if you click on Clients tab of Connectify software as shown here.
Connectify connected wireless client
Recommended Articles:
Internet Connection Sharing (ICS) in Microsoft Windows
Quick Guide to Configure Wireless Router as Access Point
Using SoftPerfect Network Scanner to Scan Network

Share this page: 
What’s this?
 

Powerline Ethernet Adapter – Simple Way to Extend Home Network

Powerline Ethernet Adapter – Simple Way to Extend Home Network

Have you heard about powerline ethernet adapter? Ha! This is simple and useful adapter that you can use to extend home network by making use of home’s powerlines and connect to other computers or network devices.

Here are benefits of this adapter:
Convenient - This adapter is convenient to be used if you want to reduce the usage of network cables and make use of powerlines to extend network.
Plug and Play - Plug in powerline adapter and other network devices and it will work.
Fast & Secure – 85 Mbps, 200 Mbps or higher transmission speed over powerline network.
Secure - Data transmission over powerlines is secured with 128bits AES, 56bits DES or other encryptions.
Easy to Expand Network - Can add new powerline adapter to expand network, but must be compatible with existing powerline adapters.
powerline ethernet adapter
Let’s explore on how to use it. It’s easy to use as it is plug & play. You need to have at least a pair of this adapter in order to make it works. As you can see example below, I use a pair of powerline adapter to share Internet via wireless router in room A with a computer in room B.
powerline Ethernet adapter network
You just need to plug the powerline adapter into power outlet in room A, and then use a network cable to connect router’s LAN port to powerline adapter’s network port. After that walk to room B, plug the powerline adapter into power outlet and also use a network cable to connect computer’s network card to powerline adapter’s network port. That’s it! Both devices should now be able to talk to each other after waiting for some times, the effect is same as you connect computer and router with network cable directly.
Please note the data transmission over powerlines is secured with default encryption key, and so you are advised to change it as according to product manual. You should also install powerline utility in order to manage the adapters better. If you are interested, have a look on these powerline ethernet adapters.
Note: Some of the powerline adapter might comes with 4 or more network ports, so you can connect more network devices to single adapter.

How to Enable Windows 8 Remote Desktop Feature

How to Enable Windows 8 Remote Desktop Feature

How to Enable Windows 8 Remote Desktop Feature? You will think about this if you want to connect and access this Remote Desktop enabled computer from other Windows computer in order to manage the system, use application, print document or access other resources.
This remote desktop connection feature can be enabled in Windows 8 Enterprise and Windows 8 Pro, and you can connect to it from a computer running any edition of Windows XP, Windows Vista, Windows 7, Windows 8 or Windows RT.

Let’s follow these step-by-step instructions to get it works:

1) On start screen, click Desktop tile in order to go to Windows desktop environment that you are familiar with.
Windows 8 desktop
2) When you are in typical Desktop environment, move your finger or cursor to the upper or lower right in order to open the Charms bar, after that click on Search charm.
Windows 8 search charm
3) Search charm will appear, select Settings and type system and proceed with searching, after that click on System from search result.
search system settings
4) Proceed to click on Remote settings in System window.
Windows 8 remote settings
5) Immediately your will be shown Remote tab in System Properties window, this is the location you could enable this Remote Desktop access feature. Click on Allow remote connections to this computer option if your Remote Desktop client could be initiated from older windows OS, such as Windows XP or Vista.

Check the box next to Allow connections only from computers running Remote Desktop with Network Level Authentication (recommended) if the Remote Desktop clients are from Windows 7 or Windows 8. This is much secure way to establish Remote Desktop connection.

You are also required to click Select Users button to choose the users that can connect to this computer remotely. Continue to read more below before clicking Apply and OK button.
Windows 8 enable remote desktop
Note: If you click Select Users button in System Properties window, you can add the users that can connect to this computer remotely. By default the current user id that you use to enable this Remote Desktop will be allowed to connect remotely (which is Denis the current logged on user in this case). You can click Add... to add other users.
Win8 remote desktop users
Note: Please note that the Remote Desktop must be enabled (in your respective network location type) as exception in Windows Firewall, so that this Remote Desktop traffic will be permitted by firewall! If not this Remote Desktop traffic will be dropped by this firewall and you could not access Windows 8 computer remotely.

If you are interested about the Remote Desktop port number, the port number is TCP3389.
remote desktop 3389 for firewall
Note: Please also make sure Block all incoming connections, including those in the list of allowed programs check box is not enabled in Windows firewall! If it’s check, then no remote connection can be made from other computers.
allow remote desktop through firewall
That’s it! You have done it. You can now connecting to this computer from other computer with remote desktop client.

Speed up a Windows 10 computer

The Microsoft Windows 10 operating system is quite efficient and performs well using default settings. However, it is possible to speed up Windows 10 even more and improve its performance. Try one or more of the following options to speed up your Windows 10 computer, as well as help reduce or eliminate potential errors.

Turn off shadowing and visual effects

Windows 10 includes some appealing look and feel features to program windows, text, icons, and other areas. While it may look nice and even flashy, it comes at a cost. Those features, otherwise known as shadowing and visual effects, use up system resources, which can cause Windows to run slower.
To turn off these resource draining features, follow the steps below.
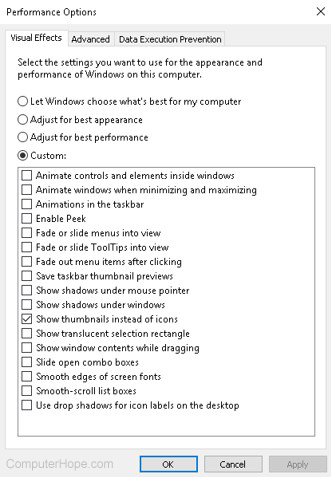
  1. In the Search Windows text box, next to the Start button on the taskbar, type sysdm.cpl and press Enter.
  2. In the System Properties window, click the Advanced tab.
  3. On the Advanced tab, click the Settings button in the Performance section.
  4. In the Performance Options window, select the Adjust for best performance option, then click the OK button.
Windows 10 Performance Options
Tip: If you have picture files and like to see a thumbnail of that picture as the icon for the file, check the box for the Show thumbnails instead of icons option. Doing so will result in the Custom option being selected instead of the Adjust for best performance option, which is okay.

Adjust Windows power settings

Computers use power, that is no secret. However, how and where computers use power is not something commonly known. By default, the Windows operating system often utilizes a power plan that can result in slower computer performance. If you have a desktop computer, or a laptop computer connected to a power adapter, you can adjust the power plan used by Windows and increase the computer's performance.
Note: If you have a laptop computer and are using the battery instead of the power adapter, it is recommended that you do not adjust the power plan. The battery can be drained much faster if you adjust the power plan to allow for higher performance in Windows.
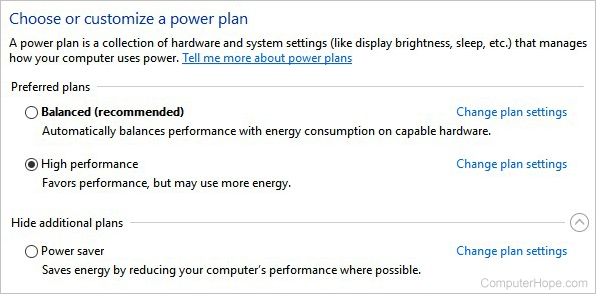
To view and adjust the power plan in Windows, follow the steps below.
  1. Open the Windows Control Panel.
  2. Find and click the Power Options utility.
  3. In the Power Options window, select the High performance power plan, then close the window.
Windows power plan options
If you want to adjust or the settings of the High performance power plan, click the Change plan settings link next to that power plan option. You can adjust two power settings in the Edit Plan Settings window, or click the Change advanced power settings link to further adjust the power plan settings.

Run Windows System Maintenance

Windows 10 has a built-in maintenance utility that can help find and fix issues in the operating system. It can also identify and run processes that can help improve computer performance.
To access and use the Windows System Maintenance utility, follow the steps below.
  1. In the Search Windows text box, next to the Start button on the taskbar, type system maintenance, then press Enter.
  2. In the Security and Maintenance window, click the Troubleshooting link towards the bottom of the window.
  3. In the Troubleshooting window, under the System and security section, click the Run maintenance tasks link.
  4. Click the Next button to run the Troubleshooter utility. If a message appears saying to run the Troubleshooter as an administrator, click the Try troubleshooting as an administrator option.
Windows Troubleshooter
  1. If any errors or issues are found, or any suggestions are provided, follow the steps to fix the errors and issues, and implement the suggestions.

Stop/remove TSRs and disable startup programs

Programs and processes that run in the background, known as TSRs, use up memory on the computer and can cause the computer to run more slowly than it could. Some of these programs and processes are not essential to the operating of the computer and Windows operating system, and they can be turned off.
To turn off and disable TSRs and other programs that startup with Windows, follow the steps provided on the web page linked below.
If you are unsure which programs and processes to turn off and disable, visit the Should I Block It website linked below and search for the name of the process or program. The Should I Block It website can help you determine if the process or program is needed or not for correct computer, Windows, or other software operation.
  • Should I Block It?

Clean the Windows registry

The Windows registry stores lots of information about the operating system, software, and files. If there is bad information, incorrect shortcuts to programs, or other problems, it can cause the computer to run slow. Issues in the registry can also cause errors, including blue screen of death errors.
Correcting problems in the registry can help to speed up a computer, allow it to run more efficiently, and eliminate errors. The registry is very complex and not something you want to fix manually, as it could cause even worse problems. Using a registry cleaner is a better option. Below are a couple registry cleaners that we recommend.
  • CCleaner - fixes many registry issues, and includes several additional tools to speed up a computer
  • EasyCleaner - a basic, but powerful registry cleaner
  • Glary Utilities - a powerful registry cleaner, and includes several additional tools to free up hard drive space and improve computer performance

Top 10 online services and applications

Top 10 online services and applications

Updated: 01/02/2018 by IT Solution
There are thousands of services and applications available on the Internet today and finding the best ones to fit your needs can be difficult. Below we have provided our top 10 list of services and applications on the Internet.

Google services

top 10 online servicesGoogle has a wealth of free online services and applications that everyone should use. Below is a listing of some of our favorites.
  • Google Docs - Fantastic collection of free services including a word processor, spreadsheet, presentation service, online forms, drawings, and more. Each of these services can also be viewed and edited between multiple users.
  • Google Calendar - One of the best if not the best online calendars available to create appointments and even share events between other users.
  • Google Translate - Another fantastic free service by Google that allows you to translate any text, website, or document into another language with support of over 50 different languages.
  • Gmail - By far one of the best online free e-mail services with an almost endless list of features and probably the best e-mail spam filter.
  • Google maps - Excellent maps service that not offers updated maps, directions, satellite views, and even street views of much of the world.
  • YouTube - The premier location to share and view online videos.

RescueTime

RescueTime is an excellent service that can help keep you focused while on the computer and track how much time you spend on each task. This service keeps you focused while on the computer by only allowing you to perform productive tasks and can prevent you from accessing unproductive programs and websites. RescueTime also offers a wealth of graphs and data to see where you spend your time and can even keep track of how much time you spend on each web page you visit.

WOT

An excellent add-on that can be added to any major Internet browser including Internet Explorer, Firefox, and Chrome that alerts you to any Internet page you are visiting that is not safe. This service works by allowing any user to create a comment and rating on any website, which WOT uses to alert a user if the site is not safe. WOT protects you from any web page with malware, reported scam sites, sites that invade privacy, or conducts other fraudulent activities.

Dropbox

Another great tool that allows you to share and sync any file between your PC, Mac, Linux, and Mobile device. Not only is this a great tool for sharing your files but it is also a great tool for backing up your data online.

Grammarly

Fantastic service that checks for misspellings, commonly confused words, plagiarism, grammar errors, punctuation, and will even suggest alternative synonyms. A Microsoft Office add-in can also be installed to check any document you're working on within Office. Finally, with each suggested correction an explanation about the problem, examples, and the ability to ask the community is made available.

Flickr

The most recognized and used service for exploring, sharing, and storing photos online. Thousands of pictures are uploaded to this website every minute, making it a fantastic place for inspiration for any photographer and a great place to store, show, and print your images.

Skype

Another great online service and tool that allows anyone to make phone calls and video calls between other Skype users over the Internet.

Pixlr

From Autodesk, Pixlr is a fantastic online image editor, effects editor, image markup, and color editor that can all be done through your Internet browser.

Wikipedia

Wikipedia is an online encyclopedia that has been generated using millions of different contributors around the world. It contains over 3.5 million different English articles on almost every topic imaginable and millions of other topics in dozens of other languages.

PayPal

The number one used service for taking and sending payments with or without using a credit card.

Additional information

Contact Us

Phone :

+91-9971348171

Address :

H-21, Sai Garden ,
GHAZIABAD

Email :

iter.sumitraj@gmail.com

onlysolution4it. Powered by Blogger.

Using SoftPerfect Network Scanner to Scan Network

Using SoftPerfect Network Scanner to Scan Network Let’s talk about SoftPerfect network scanner , a simple network tool that you can use...

Search This Blog